 light drawing
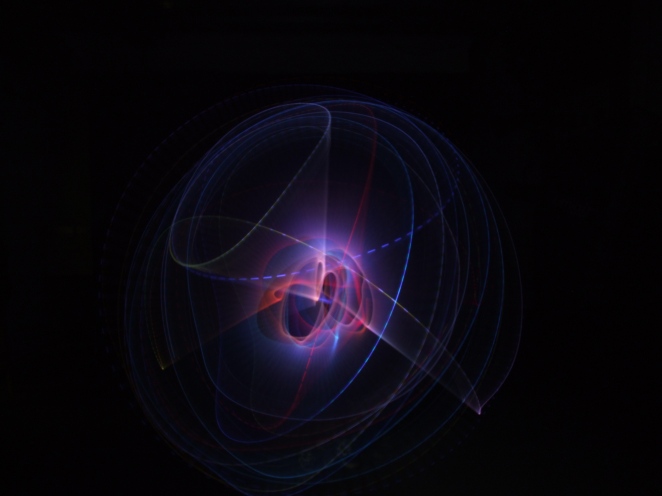
This week, we learned how to create light drawings. Which is basically a photo that uses light to draw something. this is done by putting the camera on a timer where it process the photo at a slow rate in order to pick up the light. This needed to be done in the dark, otherwise the camera would not pick up the light as well. For example, if it was done in a well lit room, the light used to create the drawing would not be as defined as well if it was in a dark room. I tested it with this light up stick that Barry brought in, which reminded me of a lightsaber.
With these photos, we used the makeshift lightsaber to create patterns. The colors shown in both photos were done with the random colors the object had, creating this mesh of dark colors, which are mostly reds and blues. This shows that the lighter colors were not picked up. Although this creates something otherworldly, the colors do not stand out as they are dark and blend into the background a little too much. Possibly for next time, I may need to move the light slower then 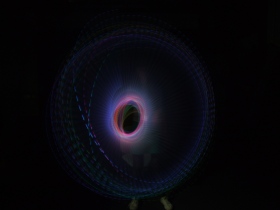
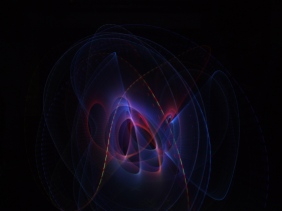
done for these photos. as the camera might find it a little difficult to capture if the light was moving quickly. The photos show that the end of the stick was visible as thin lines are shown more then streaks, which do show up, but are blended into the background. Which this photo on the right, the object was moved around in a circle, which created this wormhole effect, but still looks faded as the light is shown more when the object is repeatedly moved in the same area. This shows that for next time, I need to slow the movements of the object to create more prominent photos. After doing this, I then used light to highlight objects. I had 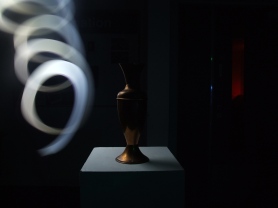 done this by using a flashlight app on my phone and slowly moving it around the object. With this, the light was more brighter so the camera picked it up better then the light stick. With this, I had experimented with different ways That light can be used. These two photos show this. The first photo I tried to create light on the object, but it didn’t turn out right as the light only illuminated the back where the camera could not pick up. The photo below this one shows the object fully illuminated as I had lit up the part of the object
 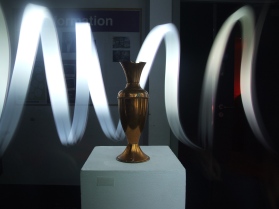 that was facing the camera first, then created a pattern behind it. The worked better as the object can be seen better then the photo above, which I didn’t do for this one. In the third photo, I wanted the light to be shown that it was coming out the object. It took me a few tries to do as I had not managed to get the light close to the top of the object to make it look like it was emitting light. By this photo, I decided to turn off the light after I lit up the object and turned it on again when my phone was close to the top. Resulting in this photo
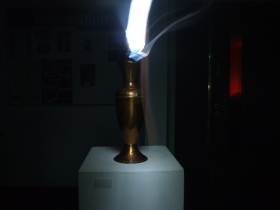 . Although it could be better if there was more light in the photo instead of one streak exiting out of the top of the frame.
flat lighting
This week in the studio, I learned flat lighting. This lighting is usually for photos for passports or in professional photoshoots where lots of light is needed. In my opinion, I find this lighting technique quite boring compared to the other lighting techniques I have learned. This is because, especially for head shots, the face needs to be lit up and no shadows are visible. This is done by using two lights facing around 45 degrees on the face, so that light is cast over the entire face. Sometimes for women, three lights are needed to illuminate under the chin. It is also boring because there is no define style compared to rembrandt, which has a style I like or butterfly lighting, where it has some shadow.
filters in darkroom
In the darkroom this week, we are still using our negatives to create an enlarged image of them, but instead we began using filters to create tones on our images. I found it a little difficult to correctly expose the image, as some of my images I took are dark, so I needed to work out the correct time to expose the image. this was the same for using the filters as well, usually because they can alter the image to either be darker or lighter depending on the filter used. for an image, I wanted to use a lighter filter to bring out the details of it. but unfortunately it became too light as when I developed it, nothing appeared, meaning that I needed to expose the image for more time. Luckily, these were test strips, so that I wouldn’t be wasting paper.
Practical work and Jen Stark
we learned about Jen Stark’s work and done some practical work, who specializes in this field of work. we used a photo and copied it a few times to make the effect that the picture looks 3D. this is done by layering the photos on top of each other. I chose a photo of the college stairs, which I thought could be useful in 3D. I decided to make parts of the stairs, the underside of the first floor and the wall stand out by using the extra photos and cutting them out to layer them onto of the original photo. to make it stand out more, I used three layers that were levitated to give a sense of depth, the top layer being the bottom part of the stairs and the underside of the first floor.
