18th May

this week, I was able to shoot for my Final Image. In which one of them was for the final image called ‘Hidden’ and the other called ‘Castout’. For ‘Castout’, I had a bit of trouble getting the subject into focus, but managed to get them into focus and have the correct exposure for one half of the image. for the second half, I originally wanted to have a grey background for the subject who was facing the camera, however, when I reviewed the shot, I found that the subject does not show as much as I wanted them to be. so I instead changed the background to white, in which turned out better in the image. when I began to edit the two images together, I made two versions of the final image. one was where the subjects in the background were copied and pasted into the image and placed in different areas of the image. the other version was the subjects in the background on one side were flipped so that the light source seemed to originate from the middle of the image. with a bit of peer feedback, I decided to use the version where the subject was flipped on one side of the image as this felt more natural within the image. then with this, I made them black and white and lowered the saturation so that the subject facing the camera would be focused on first. but I felt the subjects in the background didn’t feel as if they were fading into the background as the light that is shone on them looked too bright. so I made another layer and colored in where the light had shone onto the subject  with black and a low opacity to dull down the light. this would make them look like they were walking away into the darkness.

With ‘Hidden’, I wanted to have an image that suggested that the subject was hiding away from society. for this, I had the subject looking away, making out as if they are pulling their hood over their face with a sad or depressed expression. with this, I took shots at different angles to see if I could capture the mood differently in the images. I also got the idea for a test shoot, where it looks like someone is trying to pull the subjects hood off their head. This was done by masking the image of the arm into the image of the subject. with the edits I had done to the image, I felt that the white background had to be lighter, so with another layer, I had brightened the background with the white color brush tool, making sure to carefully go over near the subject and arm. I would continue with this to finish the image.

11 May

this week, I have finished editing some of my images and have reviewed. most of them were test shots to see how well I could show negative emotion within an image. This was for the outdoor shoot where the camera was situated behind the model with the animal ears. For this, had made the image black and white and cDSCF2476.jpgorrected the brightness and contrast to what I wanted. which would be to have as much detail as possible on the models in the image. I had then, in photoshop, added another layer to have the background darker then the models themselves. this is to make the models stand out and the viewer focus on them instead of the background as that has a bit of detail the two images show the DSCF2476.jpg
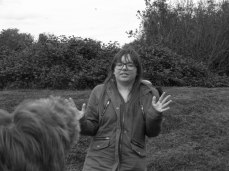
difference between the original black and white image and the image with the color layer. the difference is subtle as I didn’t want the background to be significantly darker so that it wouldn’t be the first thing to notice as well as making the models look as if they were placed into the image through editing. so I lowered the opacity so it wouldn’t be as noticeable within the image. as you can see, the model pops out of the image on the bottom image due to darkening the background. I had done this because I wanted to viewer to focus on the models reaction to the other, showing a negative emotion.

I had also drawn up ideas on my other final images. which would be shooting a model where they look sad. for this I want to have the camera zoomed into their face to have the image be on a personal level. meaning that I would have to zoom rather close to shoot their expression, in which I would need a tripod to keep the camera steady so their wouldn’t be any motion blur. however, when zooming into what I want to take a picture of, it sometimes blurs what the lens picks up, meaning that if zooming does not work them I would have to place the camera closer to the model them I would normally would to get the shot I want.


4th may

this week, I was able to shoot for my images in the weekend. For the images, I needed two models other then myself, so I managed to organize a day to meet up on the weekend to do so. overall I think it went well, I managed toget the images I needed for the outside shots, where it was in a playground on a meadow where I live. luckily my friends don’t live too far from my home, so the location was easy to travel to. the second location was one of my friends home as with the layout, it was easier to walk around and take certain shots compared to my home.

this image on the right is one of the images taken DSCF2474.JPG
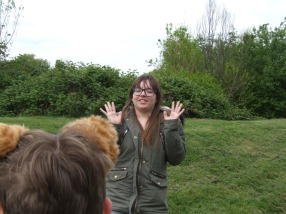
outside. this is to represent how certain people are viewed as they are not classed as the norm in society. the model in the foreground represent the people in society who feel they do not fit in and look obvious. this is represented with the animal ears the model is wearing, as they show the physical difference of society. the model in front of them represents the norm in society, who are afraid of difference and want everyone to be the same. hence why the model looks surprised to see the subject with the animal ears as they have their hands up in shock and looks as if they are stepping away, unsure what to do in the presence of the other person. however, I feel that I could have taken the image better. for example, I could have taken the shot further back so that the model with the ears would be in more of the shot to distinguish that the model looks human ( i.e. have the models head more in view) but by doing that, I feel that the shocked subject might not fit into the frame as much. since the subject in the foreground would fill most of the frame, I might not be able to capture the emotion the subject in the background would have. I also feel that the subject facing towards the camera could have had more of  negative response to the other subject, so for next time I would need to ask for a more negative response.

i have also planned for more final image ideas this week. for this idea, I am planning to have a person trapped within the mirror. this would be the person who doesn’t fit into society, they would feel trapped and could not get out. for this I would need a mirror to shoot, which would be quickly accessible.

27th April

Location Planning

I have planned some locations to shoot for my images. I decided to do this because I feel that shooting in the studio might not be ideal to do mainly because a blank background would not fit with the theme I am doing. For this, I have wrote up pros and cons of using the locations I could be using,which would be in a field, a wood/forest or indoors. But I am focusing more towards using fields and woods mainly because I plan to shoot the subjects that have different views on each other as they are different because of the term
othering. For this, I am showing a physical representation of someone who is an outcast, they would have animal ears to show they are different. which relates to one of the research points I had done. With this,Screen Shot 2017-04-27 at 11.37.46 AM.png 
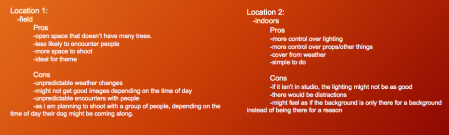
I would be using a pair of wolf ears I had made pior to this. the image on the right shows some of the locations I am planning to use with the pros and cons listed

Idea Planning

I had also planned more ideas to use for the locations as well as planning for the final images. For these, I had said what I need to do a well as list the things that could go wrong during the shoot, which I feel for some of the shoots that is likely to happen. Because of this, I have said how i could minimize these risks and how to overcome them if they did happen.

What I plan to do for next week

Over the weekend, I have planned to shoot on these locations with the props I have. I have also planned to do some more test shots at home. With these, I would be able to edit them with photoshop to how I want them to look like. For some of the images I would be shooting, for example I want to shoot an image that is looking over the outcasts shoulder directly towards the person who has seen them. For this, I want the outcast to be blurred to show that the focus of attention would be towards the reaction and not the person who caused the reaction. I plan to do this so that the headband that the ears are attached to would not be visible as much and to make the ears look as if they are real.

I am also planning to shoot for recreations to some of the artists I had researched as well as other research that is related to the theme. this is to see if I could be able to use some of the techniques I have learned well to use in my final images.

20 April

this week, I have been planning what I need to do for this project. for this, I have decided what I needed to test shoot and where to shoot. for the ideas I have come up with, I had decided to have two dimensions collide with each other, which could be through a mirror. this was inspired by the TV series Grim, where a monster from the nether world is trying to enter this world through a mirror. for this idea, I could take a picture of clear water that has ripples in it from an object I will drop into it, by doing this, I could mask the ripples over the mirror and bring through the world it reveals. but this might take some time as I would need the studio in order to capture the ripples on the water clearly. as well as finding someone and mirror to take a photo of. which I might not be able to finish in time.

I had also planned out what recreations I would do. one of which I am recreating Erik Johanson’s image of a man pulling the road behind him. for this I had chosen to do something similar, but instead of pulling a road, I would have someone look like they are pulling grass over a pavement or a patio. which I would need to take a photo of the location itself first before including the person and the object needed, that might be some fabric or a large blanket so I could place the grass onto it. I will do a test shot of this first to see if I can be able to do this.

16th March


shooting in the studio

this week, I have been shooting for What’s the Story. I continued with stop motion to see if I could improve with it. This time I didn’t use the figure I used last time as that was too stiff in the joints and the motion didn’t look as realistic as I wanted it. I instead used two of my own lego figurines as they had movable joints which could be removed and put back. also with the figurines I used, I could position them how I
wanted them as they weren’t fixed on a stand. Because of this, I had a lot of freedom to what IDSCF2110.JPG wanted to do.

with this, I made a test with the figurines to make them look like they were fighting each other, with one of them falling off the platform. with the lighting, I had a spot light aimed at the figures at first. but Unfortunately, with the position of it, only one of them were lit up resulting in the other being in the shadows. because of this, I used another light to illuminate the other side for both the figures to be seen in the photo
At this time, I haven’t made the photos into a short film yet. but when I was reviewing them, I noticed that some of the images may not line up with the previous image before them resulting in the motion looking a little jerky. but I won’t know for sure until I have made it. this might be because of some of the problems I had encounted while doing this. I had used blu-tack on the feet to keep the in place, but unfortunately, when I positioned the figures in a certain way they kept on falling down. this might be because the blu-tack couldn’t hold the weight because I used a little or might be bDSCF2141
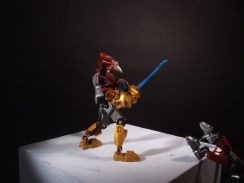
ecause it went into the holes on the underside of the foot. I tried to stablaise it by putting more blu-tack on the side of the foot away from the camera, but that didn’t work. So I in
stead positioned one of the figures so that they could stand without assistance. with the other, I had to hold it as I wanted it to look like it was falling off the platform but that was fine as most of it was out of the frame anyway.


9 March

shooting in the studio

this week, I decided to shoot some photos in the studio for What’s the Story. This is because I had lost the images I shot last week becauDSCF2047.JPG
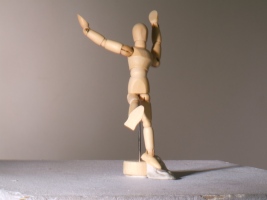
se my card malfunctioned. This also means that I had to make the gif again, because I didn’t
save it properly. This time, I positioned the figure with blu tack so that I wouldn’t accidentally move it and potentially ruin the movement of the limbs. I made sure that the limbs
are moved a little bit for it to look fluid in the gif and so it actually looks like it is walking instead of wildly making vague gestures.DSCF2055.JPG
I had also positioned the figure to look like it is slipping on a peace of blu tack for a still image. What I had found out when I positioned the figure, the shadow it cast looked like another person who looked like it was reaching out  towards the figure to help them. However, once I had taken the image, it did not translate well from what I could see to the camera. making the shadow look large and blurry,
due to where the light was situated.
What I had found out was to make DSCF2064.JPG
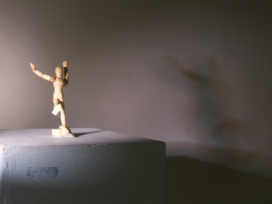
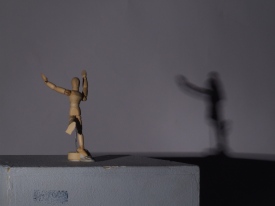
the shadow look clearer and shaper, I needed to move the light away from the figure in order to have a clear image of the shadow to capture what I could see with my eyes.

Also with the shadow, depending on where I had positioned the camera I could make the shadow look like it was a mirror image of the figure. Meaning that the shadow and the figure looked like they are facing opposite ways. with this image, with the figure looking as if they are going to fall backwards, the shadow instead looks like it is going to be jumping off the platform I had put the figure onto.


more research and planning

for my FMP, I have continued with research and linking how media affects the theme i’ve chosen. As well as finding photographers and artists that link with the theme. this week I began planning how I want to shoot photos. I had done some tests shoots but unfortunately since my camera malfunctioned, I lost the images so I would need to shoot them again throughout next week.

2nd March

what I want to do for FMP

from last week, I have worked out what I wanted to do for my FMP. This week, I have decided to do the theme “The Other”. I have done more research on the themes I have chosen, also “Boundaries” and “Man vs Nature”. From these two, I don’t feel comfortable in them due to the research I have done on them. I feel that with “Man vs Nature”, there isn’t much variation on how I can interpret it. For example, I could interpret it as literally man vs nature, where man battles nature while trying to survive. Or how nature takes over man made structures because they were abandoned. With “Boundaries”, it could be either literal, or metaphorical. With “the other”, I feel that I take different things and use them for this theme.

shooting in the studio

In the studio, I had worked on a shoot for What’s the Story. DSCF1928.JPG
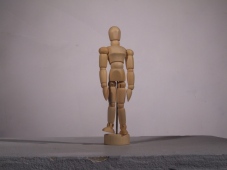
For this, I wanted to test shoot a gif. I had used a small model figure and posed it differently for each shot, but making sure that the poses continue from the last. I wanted to test how well
I can make a gif that is stop motion with a figure as I want to use one for my final image. I have yet to put them into a gif at this time, but I have gone over the images on my camera and have gathered that the motion may be a little jerky. this is because of the model figure I had used was a little stiff around the joints, so I couldn’t place them in a position I wanted because of that. I wanted to make the figure look like it is walking, but due to the stiffness in the joints, this might not portray that and instead look like it is dancing strangely.

I had also shot tests for my FMP. For this, I first
DSCF1980.JPGtook shots of Kim by herself with a black background to portray
the loneness that is caused by taking others out of a group by force. but this didn’t show it with just one person in the image. I had also found that with a black background, the face in which is illuminated by the light, becomes overexposed and creating a ghostly effect. I then moved the lights so that the
y were shining light above Kim, and asked her to put her hood up, so that her face wouldn’t be as overexposed. DSCF1992.JPG
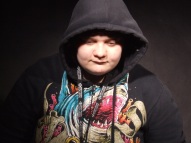
this had worked better, but I felt that it still needed something else.
So I then decided to used other people to create the effect I wanted for the theme “the other”. With Kim still facing towards the camera, I had the other four behind her, facing away from the camera and towards the black background. With this, I feel that it makes more of an impact then the other two images, as it clearly show that the center peDSCF2004.JPGrson,
who is illuminated and is kneeling, is being forced out of a social group, while the group, represented by the four people behind is carrying on with life. they are slightly illuminated to show they are there, as earlier test shoots had shown that they did not show up in the image if both lights are focused on the kneeling person.

Darkroom

With my FMP test shot, I had turned it black and white and printed it off to see if I could create a negative image in the darkroom using the light sensitive paper. However, I realized I had done an error as I forgot to invert the colour of the image on lightroom. I didn’t realize this until I had already printed the image and already began to develop the image on the paper.  However, this didn’t turned out so bad only looking a little fuzzy. but one of the background people blend into the background, making them hard to see. As well as some the detail being lost  Next time when I do this, I will make sure to invert the image and to ajust the light exposure so that the image won’t be as fuzzy and making sure that most of the detail is captured.

23rd febuary

starting FMP

this week, we are staring our Final Major Project. From the brief, I had to choose three out of six options to use for the project. I had picked ‘The others’, ‘Boundaries’ and ‘man vs nature as I feel they are more interesting to do.
With ‘man vs nature’, I could do something that is related to early man and how much humans have evolved to  a point where they might be unable to live in the wild due to the comfort of houses and warmth. with this, I am thinking of using a forest or woods to show the nature part and someone who is possibly camping there. this might be a little tricky to do as I would need to find a wood that is dense enough as well as isolated so that there are no buildings or vehicles nearby that could end in the image by accident. I also need another person to shoot, which could be difficult as they might not be available at the time or the people I want might not want to be photographed.
My second option, ‘Boundaries’ I’m not quite sure yet on what exactly I want to do for this.  I have researched on this, and found that it could mean something that you can’t cross or personal boundaries that are crossed into being uncomfortably close. I think I need more research to work out what I want to do for this. but again, I might need help of others, who might not be willing to do.
My third option, ‘The Other’, I could do something that is a little fantasy or out of this world. this is because, when I had done some reasearch on this, I had found that there is a term called ‘Othering’ which describes the pratice of excluding a person who doesn’t fit the norm in social groups. I could do something that is along the lines of the term, where a group of people are excluding someone because they don’t fit in.

9th January

new project this term. this time the photography will be narrative. on Thursday, we had to pair up and plan a series of images that depict a narrative. me and Kim planned out that at the beginning image will be black and white with only one person in the image. this was to show that the subject was sad and lonely. the next two show another person entering the frame, with this one on colour to depict happiness, holding a balloon. the balloon deflates over the sad person, slowly giving back their colour and to the background. this was done with photoshop, to brighten each image more then the previous one and to mask the images to create the stand alone colour subject that is holding the balloon. DSCF1518.JPG
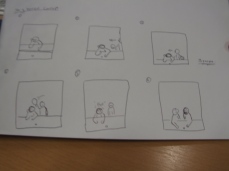
the photo shown is the plan me and Kim made to work out what we wanted to do. in it, we originally wanted the two subjects to be seated and to use one of the picnic tables outside, but we decided no to as we were not sure if the doors were locked. also as well if the camera would pick the subjects up well due to the width of the table. so instead we shot it in the hallway, with the subjects standing instead of sitting.

Front and rear curtain flash

today, we learned about front and rear curtain flash. which is for front curtain flash the flash fires at the start of the exposure and for rear curtain flash, it fires at the end of the exposure. they can also be called 1st and 2nd curtain sync. this creates a blur going outwards of the subject as they are moving. the blur moves behind them if it is a front curtain flash and the subject moves into the blur if it is a rear curtain flash. the pictures shown are what both front and rear curtain flashes look like once the photo had been taken. the rear flash curtain looks more natural as the blur effect is behind the character then when it is in front of them, making it look like the character is running at a fast speed.flash-sync-rear.jpgflash-sync-front.jpg


the photo on the right shows my attempt atScreen Shot 2017-01-09 at 10.35.25 AM.png 
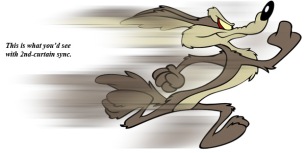
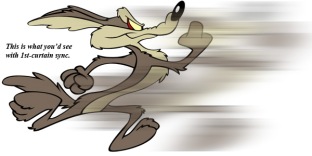
creating the rear curtain flash technique. I think with this, I need a bit more practice on and to clearly tell the subject to move more as the movement they did wasn’t really enough to create the blur trail left behind.